
Traps are a time-honored and efficient technique to allow you to be in a couple of place at one time when searching or securing property. Correctly designed, correctly positioned and correctly positioned a lure can wait tirelessly for a goal to blunder onto the ‘X’ earlier than activating.

Traps might be deadly or non-lethal, however they’ve been employed by so many cultures world wide for thus lengthy, for searching and warfare alike, {that a} thorough dialogue of such would fill many volumes.
Suffice it to say nonetheless that it’s in each prepper’s greatest curiosity to discover ways to craft and make use of primitive traps utilizing pure or scavenged supplies for a similar functions.
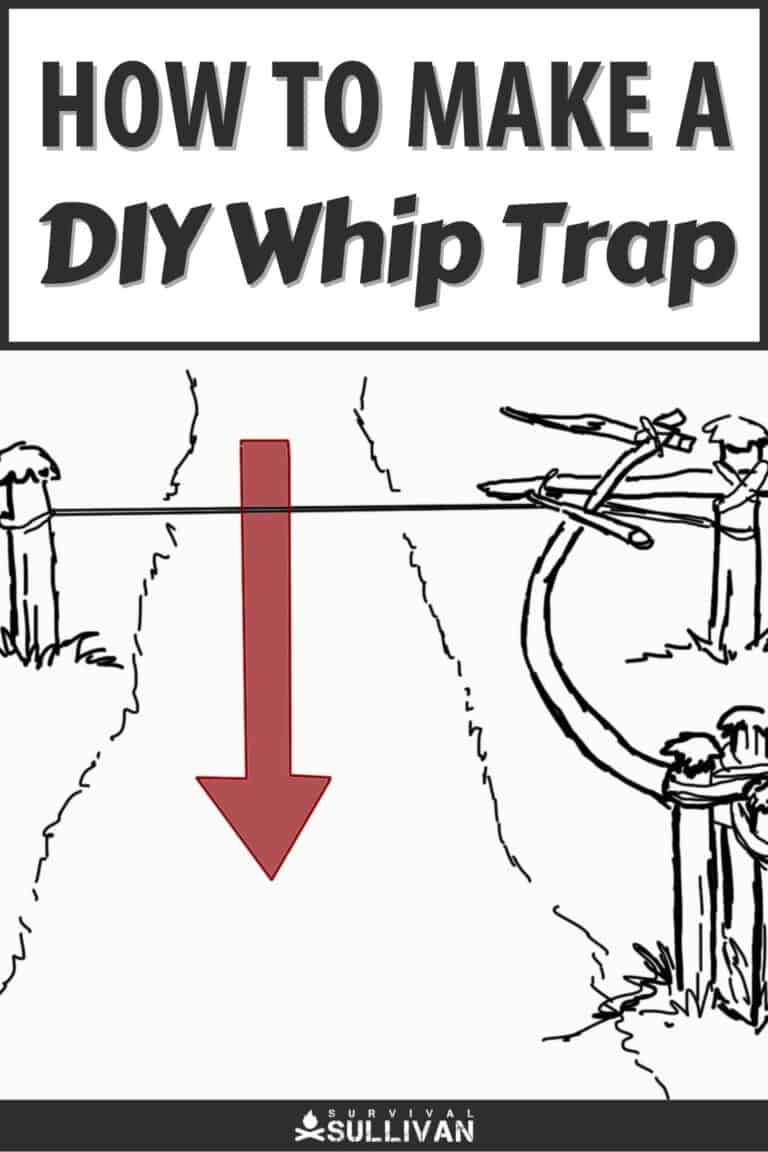
The most effective traps in case you are searching bigger sport or defending your self from harmful critters is the whip lure.
Comparatively easy and straightforward to implement, it’s nonetheless able to inflicting grievous or deadly wounds on a big sport and people alike.
This text will offer you an summary of whip lure design and employment in addition to a step-by-step information for implementing your personal.
What’s a Whip Entice?
A whip lure is one which depends upon the potential vitality saved in a versatile or springy pole held prepared below pressure to ship damaging or lethal drive to the goal when the lure is activated by the sufferer blundering into it.
Whip traps typically make use of sharpened spikes or stones hooked up to the enterprise finish to ship much more injury upon influence with the goal.
Even with out such additions whip traps are categorized as deadly traps in any case.
Sometimes organized to deploy horizontally throughout a path or different predefined line of strategy by the sufferer, with some ingenuity they could even be configured to deploy vertically from beneath and even swing down from above.
In current a long time, whip traps had been most infamously employed by Viet Cong and North Vietnamese military forces to wound, kill or delay American forces transferring via the dense and labyrinthine undergrowth that made up a lot of the terrain in Vietnam.
Why Use a Whip Entice?
Amongst all the traps you may assemble utilizing pure supplies or a mixture of pure supplies and scavenge provides, whip traps strike the perfect steadiness between ease of building and sheer lethality.
Designed appropriately and positioned with care, these traps are greater than able to severely injuring and even killing a big animal, they usually may do the identical to human beings.
This affords Preppers many benefits, specifically the power to maximise the probabilities that they are going to deliver down protein-packed huge sport when searching, or the power to decisively defend avenues of strategy to their shelter or bug-out location elsewhere on their property, notably when manpower is scarce in your facet.
With some fundamental instruments, a bit of little bit of time and a few cautious testing you’ll be able to simply set up a lure that wants little upkeep however will function a ugly shock for anybody making an attempt to sneak up on you or for that sport animal you so desperately want on your dinner desk.
Parts of a Whip Entice
A fast overview of a whip lure makes them seem fairly difficult, however in actuality they depend on easy rules and elements that are straightforward to supply or vogue your self utilizing simply a few instruments.
A stout knife is all it’s worthwhile to make a whip lure, although a hatchet or noticed will definitely assist.
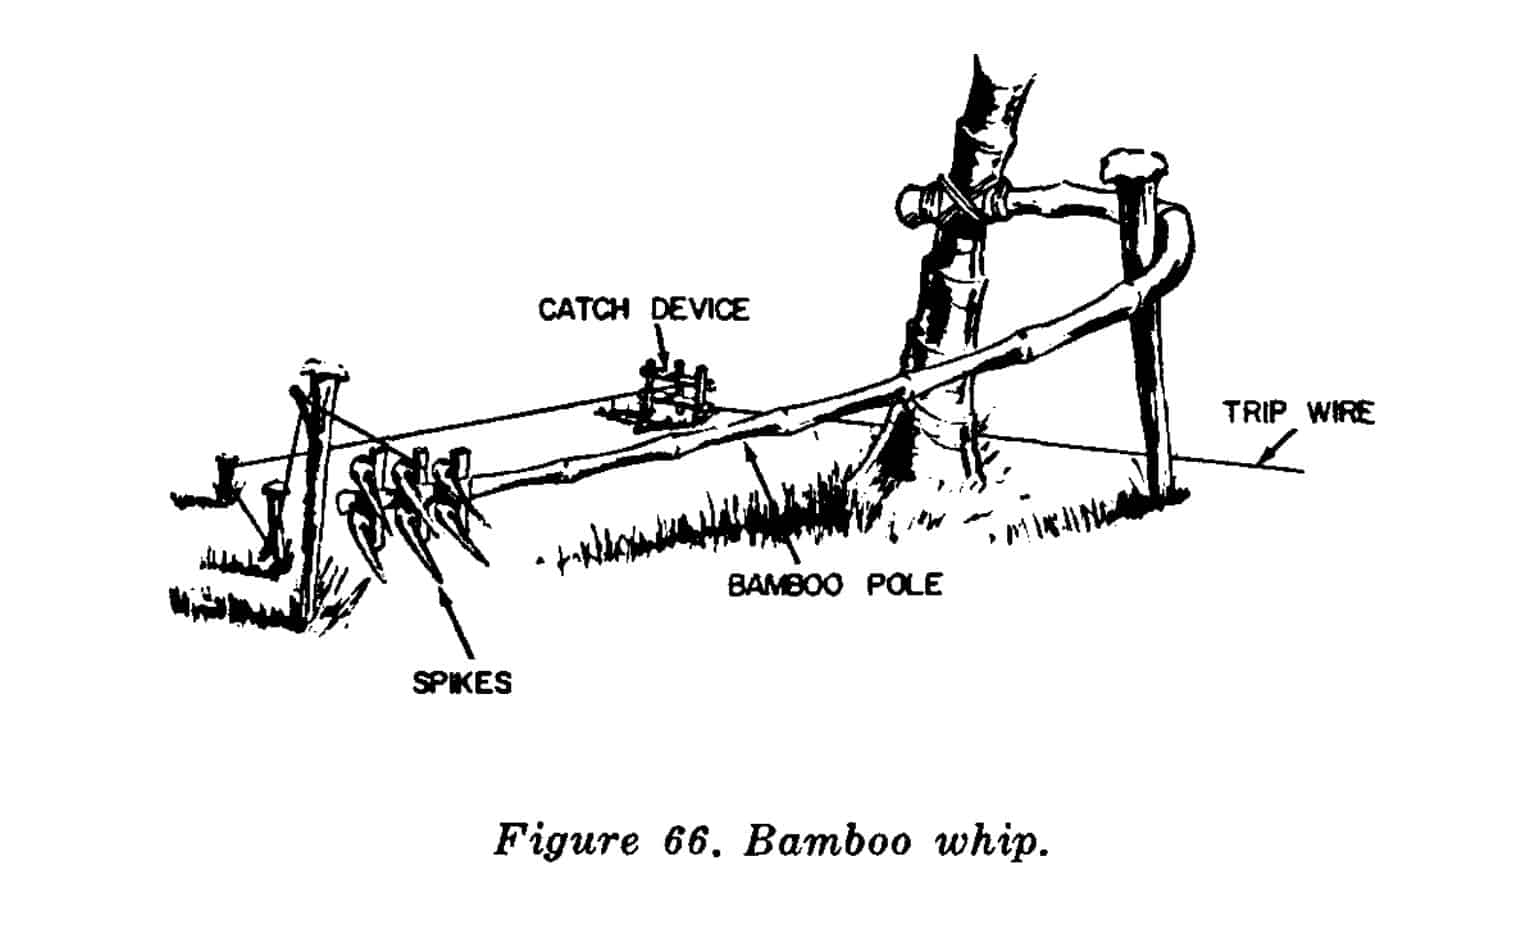
Beneath is an inventory of the elements which are typical of a horizontal whip lure, the sort we will likely be instructing you the way to make within the subsequent part.
Familiarize your self with these elements and their perform earlier than continuing to the step-by-step.
1. Mount
The quantity is the primary anchor level of your whip lure. That is the element that you simply connect the pole or whipping half to with a purpose to give it one thing to behave towards.
Historically, the mount is a sturdy tree, publish or one thing else that can resist the forces concerned whereas additionally being straightforward sufficient to camouflage that it blends into the setting round it.
2. Pivot
Usually omitted by those that are attempting to cobble collectively a whip lure design of their very own, the pivot is a secondary vertical piece positioned adjoining to the mount a bit of bit nearer to the designated influence or triggering level of the lure.
The pole is bent across the pivot to offer even larger potential vitality in comparison with what is likely to be achieved by merely bending the pole as it’s.
The pivot serves as a fulcrum, and is important for crafting a whip lure that’s able to bringing down massive sport reliably.
3. Pole or “Whip”
That is the working a part of the lure that inflicts injury. It’s also the half that requires essentially the most diligence in choice. It have to be inflexible, however extremely versatile, with numerous spring or snap when launched.
Historically, this was a chunk of inexperienced bamboo in Vietnam, however you may make do with quite a lot of pure and man-made supplies.
Remember that any lower flora should retain its elasticity because it dries and dies, or it would smash the perform of your lure.
4. Spikes
Spikes are generally hooked up to the working finish of the pole with a purpose to inflict grave injury upon the goal.
This can be a single bigger, longer spike for max penetration or a sequence of smaller spikes to extend the margin of error for a very good hit at the price of general injury.
These might be hooked up using cordage, pushed via the fabric of the pole itself or affixed in another manner that’s workable for you as long as they’re sturdy and can stay in place when the lure prompts.
You’ll be able to make the most of something from sharpened stakes of wooden to items of steel, arrowheads or anything able to penetrating the flesh of man or beast.
5. Set off/Tripwire
The tripwire, or set off, is the primary a part of the lure that the sufferer interacts with. Sometimes strung throughout a path or different avenue of strategy at about shin top, when the sufferer blunders via the journey wire the lure is activated via releasing the pole.
One finish of the journey wire is securely fixed to an anchor level on the opposite facet of the path reverse the remainder of the lure, with the opposite finish being fixed to the a part of the catch that’s pulled away.
The opposite elements that play a component within the setting and subsequent activation of the lure are detailed beneath.
6. Catch
The catch is a part of the triggering mechanism of the lure, and analogous to the sear on a firearm.
The set off interacts with the catch to launch the pole from its retained place, springing the lure.
The catch is usually positioned in step with the mount and the pit, though it’s positioned farther off of the path away from the influence level.
Mostly, it takes the type of two units of perpendicular sticks, with the primary being pushed into the bottom vertically. One member of the second set, parallel with the bottom, will likely be fastened on the prime of the primary pair.
The final piece is hooked up to the tip of the journey wire. This types a field or body that the toggle could relaxation upon when the lure is ready.
7. Toggle
The toggle is a element of the catch gadget that connects to the trailing wire beneath. That is what is going to bodily restrain the pole in place below pressure when the lure is ready.
The toggle is restrained by the 2 horizontal members of the catch gadget, certainly one of which is pulled away by the tripwire, releasing the toggle and permitting all of that pressure within the pole to be launched explosively.
8. Trailing Wire
The trailing wire is twine or rope that runs from the working finish of the pole all the best way again to the catch gadget or it’s secured by the toggle.
It’s crucial that your cordage be sturdy, mild and snag free with a purpose to guarantee most effectivity and operability of your whip lure.
The trailing wire is usually routed to the catch gadget by way of a sequence of pegs positioned low alongside the bottom with a purpose to higher camouflage it and in addition be sure that they won’t snag or foul, probably spoiling the activation of the lure.
Warning!
Earlier than you start, perceive that neither this web site, the web site’s house owners or operators, nor the writer assuming any accountability for accidents, loss of life or property injury which will consequence from the use or misuse of this lure.
Moreover, the utilization of traps for searching is tightly regulated on the state and federal degree.
Nowhere is using deadly booby traps permitted by legislation for defending house or another property towards human beings. This data is introduced for informational functions solely.
Even in case you are establishing this lure for tutorial functions you could use most warning in any respect phases of building, placement and triggering to stop an accident that may lead to loss of life or grievous bodily harm to you or another person.
All the time use correct security procedures and tools, and clearly mark any space with a positioned lure in order that no human will blunder into it.
Step by Step Directions
Beneath are step-by-step directions for establishing a horizontally deploying whip lure. Take a second to undergo the directions, and visualize the orientation and interplay of all elements you’ve got readily available earlier than you start.
Bear in mind! It’s crucial that you simply keep out of the trail of the pole when you find yourself setting it and when it’s secured!
Even with out spikes or different damage-dealing implements hooked up it’s able to inflicting extreme accidents. Moreover, keep in mind that any half below pressure may fail, leading to harm.
Assume your actions via, and all the time take steps to guard your self when establishing your lure.
1. A Phrase on Orientation
The next steps are for establishing a horizontally deploying whip lure. You’ll be able to configure your lure to swing it to the left or to the correct relying on which facet of the path you place it on.
Merely keep in mind that whichever manner you bend the pole it would deploy or swing again the alternative manner.
2. Choose Website
Website choice is necessary if you’re going to correctly make use of a whip lure. This additionally occurs to be some of the difficult steps.
Whip traps have a relatively small space of impact, they usually depend on the goal being positioned pretty exactly in comparison with another traps.
Because of this, whip traps are greatest used alongside trails or different avenues of strategy the place you’ll typically know which course the goal is approaching from.
An individual who comes upon a whip lure from both facet will possible detect it, or at the perfect be outdoors of the goal space when the lure is activated.
Locations that can funnel your goal into a good cordon are greatest. Sport trails, foot paths, logging roads and so forth all symbolize good alternatives for using a whip lure.
3. Select or Place Mount
With the location chosen now’s time to decide on or place the mount. Bear in mind, your mouth have to be sturdy sufficient to resist the forces imparted upon it when the lure is ready.
Normally the mount will likely be a sturdy tree, whether or not reside or lifeless. You probably have an image excellent spot for putting your lure however don’t have a tree to make use of you may plant a publish or sturdy log within the floor for the aim.
Simply keep in mind, you’ll must camouflage this should you don’t need people to see it, and even some animals is likely to be spooked by an apparent contraption, so take care.
4. Test Positioning of Goal Space
Now, take a while to test the place of the goal space. This ideally is the place your goal will activate the journey wire, and upon doing so about the place the working finish of the pole will strike them.
The goal space ought to be about in step with the mount in your path, though it may be a foot or two earlier than or previous it and your lure nonetheless perform properly.
A correctly designed whip lure will deploy and strike earlier than a goal can react, so take the time to visualise the goal’s place in relation to the place you’ll place your journey wire.
If it would assist the remainder of your building efforts, place a stone or different apparent marker on the ‘X’, which is the best spot the place the sufferer will set off the lure.
5. Trim Pole
Now’s the time to trim your pole to dimension. Bear in mind, the longer your pole is the extra potential vitality and larger influence it may retailer. Ideally, the working finish of the pole will influence the supposed goal exactly the place you marked the ‘X’.
You probably have a very good pole that’s just a bit bit too lengthy, don’t be afraid to trim it for greatest outcomes.
Think about leaving it just a few inches over lengthy so you’ve got additional room so as to add spikes in case you are utilizing them.
Bear in mind additionally that in case your Pole is tapering in nature you need the thinner, lighter finish because the working finish with the thicker, stronger finish connecting to the mount. Trim accordingly.
6. Place Pivot
Set up your pivot subsequent. Except you’re very fortunate, you’ll not have one other close by tree that you should utilize because the pivot. This implies you’ll must vogue a sturdy one from a department or small log.
The pivot ought to be positioned at the least a foot or two away from the mount, and roughly midway between the mount and the sting of the path, though you’ll be able to bias it nearer to the mount if the state of affairs dictates.
Be certain that the pivot is deeply seated and durable, as it would have to withstand important forces when the lure is ready.
7. Connect Spikes to Pole, if Utilizing
In case you are mounting spikes, stones or another damage-dealing implement to the working finish of the ballot now’s the time to do this. You don’t wish to be twiddling with it when the lure is ready.
Trend and fasten your spikes to the skinny, working finish of the pole in no matter manner works for you.
You’ll be able to lash them securely to the pole, glue them, drive them via the tip of the pole or a mixture of those strategies.
Simply be certain that they’re comfortable and safe to allow them to stand up to the activation of the lure and in addition to allow them to ship most injury to the goal.
8. Connect Trailing Wire to Pole
Now can be the time to connect the trailing wire to the working finish of the pole. The trailing wire is what is going to hook up with the catch and restrain the pole in place when the lure is ready.
You wish to give your self a beneficiant quantity of cordage for this goal because you may want a circuitous route of wire to attach correctly to the catch whereas remaining camouflaged.
I like to depart a lot in place after which trim it later as soon as I do know it would attain and safe correctly. For now, safe it to the pole with an applicable lashing that won’t slip below pressure.
Additionally, take a sturdy stick that’s about 5 inches lengthy and it tie the free finish of the trailing wire round it within the center.
That is the toggle that you’ll use to safe the trailing wire and the pole with the catch gadget.
9. Set up Pole on Mount
Now’s the time to put in the pole on the Mount and carry out one final test to ensure that it would influence the specified space on the path.
The interplay of the pole between the mount and the pivot is vital for proper and highly effective operation of the lure, so bear with me for this rationalization and ensure you have a look at the included picture for readability.
Think about you’re on the path and about to stroll into your lure. From this angle, you wish to safe the pole to the again facet of the mount, however the pole will then run barely in entrance of your pivot and curl round it as it’s bent again within the armed place.
This positioning is vital for max mechanical benefit and performance, so be sure that you get it proper.
Additionally, it is likely to be useful to carve shallow, mating notches in each your mount and the bottom of the pole to stop the pole from sliding or slipping.
Don’t make your notch so deep within the pole that it compromises the structural integrity of no matter you’re utilizing.
When you find yourself completed, the pole ought to be perpendicular to the path with the working finish and any spikes hooked up immediately over the ‘X’ you pre-positioned.
Carry out one remaining test to ensure that every little thing strains up and appears the best way you need it to based mostly on what you’re focusing on.
10. Place Catch Gadget
With the ballot adjusted and mounted, now’s the time to put the catch gadget. The catch gadget is mounted in step with your placement of the journey wire, on the identical facet of the path because the mount and is a number of toes away from it.
One of many easiest and most dependable catch gadgets is made by planting two sturdy sticks vertically and parallel within the floor wherever from 5 to 7 inches aside.
Then take a 3rd stick and run it between these two on the prime earlier than lashing them or in any other case attaching them collectively.
This types the body that can maintain the toggle on the finish of the trailing wire along with the fourth stick that’s linked to the journey wire.
11. Place Trailing Wire Routing
This step is easy, however necessary. You might want to place a sequence of small diameter sticks within the floor, low to the bottom, which you could route your trailing wire alongside to the catch gadget.
Be sure that to take a look at the included photograph to see the right orientation.
In essence, these will perform like primitive pulleys to offer you mechanical benefit when drawing the pole into place and in addition to assist be sure that the trailing wire doesn’t snag when the lure is triggered and the toggle releases.
Word that you simply solely want to put as many of those routing stakes as essential to place the trailing wire in step with the catch gadget perpendicularly.
As soon as that’s executed, you’ll be able to simply pull on the trailing wire to retract the pole and set the catch gadget.
However don’t try this simply but as a result of now we have to complete establishing the tripwire.
12. Assemble Journey Wire
All the items are virtually in place, now’s the time to configure our tripwire. This is likely one of the best steps, however nonetheless necessary, so ensure you get the main points proper.
Step one is to stake it securely on one facet of the path. This facet is reverse your lure and all of its elements.
Word that you must place your tripwire excessive sufficient the place it would simply be snagged by an animal’s foot or an individual’s shin relying on what you’re setting your lure up for.
With one finish of the journey wire state, run the road to the catch gadget. Now you’ll take one other piece of stick, the identical diameter as these of the catch gadget, and fasten it to the free finish of the journey wire.
Subsequent, all these left to do is to carve a mating notch on this stick and on the vertical member of the catch gadget that’s furthest from the path.
The target is that the journey wire will keep in place below pressure as a part of the catch gadget when it’s below load from the toggle.
But when the journey wire is disturbed, it’s your dislodge and permit the toggle to fly free between the vertical members, activating the lure.
This notch association is vital and requires a follow to implement efficiently. To safe and it’s doable that disturbance of the journey wire may not be ample to dislodge it.
Whether it is too sensitive, your lure may go off on the slightest provocation or when the wooden contracts.
13. Arm Your Entice
With every little thing in place, now’s time to arm your lure. Lay the trailing wire, routed alongside the stakes as described above, close to the catch gadget.
Additionally lay the free finish of the journey wire with the stick close to the catch gadget. Guarantee all connections, bindings, lashings and different attachment factors are completely safe and powerful.
Then, all that’s left to do is pull on the free finish of the trailing wire with the toggle to and thru the opening of the body within the catch gadget.
Relying upon the kind of pole you employed this may increasingly require fairly a little bit of power.
With the pole retracted, place the stick you hooked up to the journey wire earlier in place on the body of the catch gadget, forming what appears to be like like a kind of image body close to the bottom.
Then, fastidiously launch the strain on the trailing wire till the toggle is resting on the horizontal members of the catch gadget, the one completely hooked up on the prime and the half close to the underside that’s hooked up to the journey wire.
Finished appropriately, your complete lure ought to be below pressure, with the tripwire taught and the working finish of the pole pulled all the best way again off the path.
At this level, you must fastidiously take a look at your lure by standing properly out of the best way of the goal space and disturbing the journey wire with a thrown department or one thing comparable.
One widespread drawback is that you simply misjudged both the size of the journey wire with the hooked up stick for the catch gadget or your trailing wire is manner too lengthy, that means that the pole shouldn’t be below sufficient pressure or continues to be hanging out in entrance of the path. Each eventualities are straightforward to repair.
Merely lengthen or shorten the tripwire as mandatory or shorten the trailing wire to offer an extended draw. You’ll be able to see U.S. Military Coaching Round 5-31, determine 66 for extra help.
With this fundamental troubleshooting executed and your testing full, your whip lure is prepared to be used. Good searching and good luck!
Issues for Using a Whip Entice
Now that you understand how to assemble and take a look at your whip lure, allow us to delve a bit of extra into sensible employment.
Whip traps, like all traps, have benefits and downsides. You’ll must make the most of the previous and reduce the latter if you wish to discover success.
As talked about above, whip traps have the benefit of being fairly highly effective and comparatively straightforward to make. However they’ve some important disadvantages, ones you’ll must work exhausting to beat.
The primary one, notably for long-term use, is it many species of plant and tree will lose their elasticity as soon as they’re lower and start to dry out.
That inexperienced, springy sapling that appears so excellent will flip as inflexible as a strolling stick over time, that means that your whip lure will fail to perform solely until you change components.
The opposite main shortcoming of whip traps is that they’re fairly cumbersome in comparison with their small space of impact.
As you’ll be able to see from the included diagram or your personal lure that you’ve got managed to assemble there’s a lot occurring with this lure.
You will have routed cables or cordage, a big working half and extra to deal with, to say nothing that the lure ought to actually be positioned in a reasonably conspicuous place if you wish to stand the perfect probability of it activating efficiently.
All of this mixed signifies that camouflage is a prime precedence, and that’s not going to be straightforward on a regular basis.
Certain, it’s straightforward sufficient to camouflage the components which are low to the bottom, together with the journey wire, however camouflaging the pole, mount and pivot might show to be fairly tough.
Finest outcomes will possible be achieved utilizing a mixture of artificial camouflage supplies and pure, ideally reside, foliage.
Camouflage is likely to be much less necessary in case you are using your whip lure towards an animal, however it’s completely crucial whether it is getting used towards individuals.