
Conserving chickens is a rewarding enterprise and a gateway to a world of feathered delight and self-sufficiency.
The clucking of content material hens, the promise of recent eggs, and the thrill of a yard full of these charming creatures make it a very enriching expertise.
However what provides an additional layer of achievement to hen protecting is the chance to craft ingenious options that improve the well-being of your flock.
The do-it-yourself spirit means that you can create sensible and entertaining additions to your coop. On this article, we’ll delve into a pleasant assortment of DIY tasks, every designed to carry pleasure to your chickens.
Hanging Treats
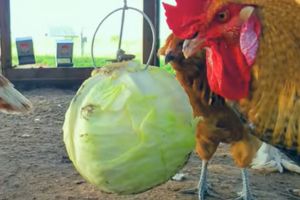 To create hanging treats on your chickens, you’ll want a corn cob, pumpkin, cabbage or different greens, and a bit of sturdy wire.
Merely thread the wire by way of the cob or vegetable, making a loop on the prime.
Grasp it securely in your coop or run.
Your chickens will get pleasure from pecking on the treats, protecting them entertained, and offering them with vitamin and enrichment.
Associated: The Greatest Fowls to Increase for SHTF: Quail, Rooster, Turkey, and so forth.
Supplies Wanted:
- Corn cob, pumpkin, or cabbage
- Sturdy wire or twine
Meeting Directions:
- Start by choosing a recent corn cob, pumpkin, or cabbage. These will function each a nutritious deal with and an entertaining distraction on your chickens.
- Subsequent, take a bit of sturdy wire or twine. The size of the wire will rely on the peak at which you need to cling the deal with and the construction of your coop or run. It’s advisable to work with round 1 to 2 toes of wire.
- Thread one wire finish by way of the highest of the corn cob, pumpkin, or cabbage. If you happen to’re utilizing a corn cob, insert the wire by way of the middle the place the cob was connected to the plant. For pumpkins or cabbages, create a loop across the stem or core.
- Twist or tie the wire securely on the prime to type a loop. This loop will function the hanger for the deal with.
- Discover a appropriate location in your coop or run to hold the deal with. You should use present hooks, nails, or fixtures or set up a hook or screw in a protected spot.
- Grasp the deal with securely, guaranteeing it’s at an applicable top on your chickens to succeed in however not so low that they will simply knock it to the bottom.
- Your chickens will love pecking and pecking on the deal with, making an attempt to entry the scrumptious morsels inside. This gives them a nutritious snack and retains them entertained, decreasing boredom and inspiring pure foraging behaviors.
Mud Bathtub From Tires
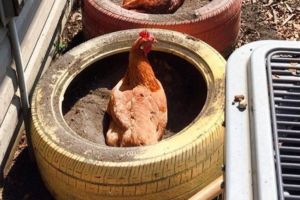 Repurposing outdated tires for a mud tub requires just a few used tires and sand or high quality dust.
Lay the tires flat in your coop or run, and fill them with sand or dust.
Chickens instinctively roll within the mud to wash their feathers and fight mites.
Associated: The Prepper’s Information For Elevating Chickens
Supplies Wanted:
- Used tires
- Sand or high quality dust
Meeting Directions:
- Collect a number of used tires, relying on the dimensions of your flock and the accessible house in your coop or run.
- Lay the tires flat on the bottom in your coop or run. Guarantee they’re steady and gained’t tip over when your chickens use them.
- Fill the within of the tires with sand or high quality dust. You may acquire sand from a neighborhood ironmongery store or use soil out of your yard.
- Unfold the sand or dust evenly inside the tires, creating a cushty, dust-filled space on your chickens.
- Your chickens instinctively use the mud tub to wash their feathers and fight mites. They’ll roll within the sand or dust, making a cloud of mud that adheres to their feathers and helps preserve them freed from pests.
Rooster Swing
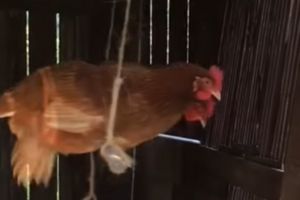 For a hen swing, collect a protracted picket stick or a sturdy department and a size of rope.
Tie one finish of the rope securely to the stick and the opposite finish to a sturdy overhead construction within the coop. Make sure the swing is at a top that enables the chickens to hop on simply.
Many individuals are unaware that chickens require psychological stimulation and train by way of actions just like the swinging movement. Be taught right here extra hen secrets and techniques that no person instructed you about.
Supplies Wanted:
- Lengthy picket stick or sturdy department
- Size of rope
- Sturdy overhead construction (e.g., a beam, rafter, or sturdy hook)
Meeting Directions:
- Start by discovering a protracted, straight picket stick or a sturdy department. This must be broad sufficient and powerful sufficient to assist the burden of your chickens. A size of round 2 to three toes ought to work properly.
- Minimize a size of rope, sometimes 3 to 4 toes lengthy, relying on the swing top you need. Make sure the rope is robust and may bear the burden of the swing and your chickens.
- Securely tie one finish of the rope to the center of the picket stick or department. Use a robust knot, like a sq. knot or a bowline, to make sure it gained’t come free.
- Find a sturdy overhead construction in your hen coop or run. This may very well be a beam, rafter, or a sturdy hook connected to the coop’s body.
- Tie the opposite finish of the rope to this overhead construction, guaranteeing it’s at an applicable top on your chickens to hop shortly on and off the swing.
- As soon as the swing is ready up, your chickens will benefit from the mild rocking movement. This gives psychological stimulation and train, protecting them energetic and pleased.
Nesting Containers from Recycled Supplies
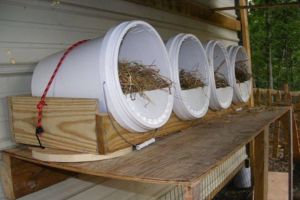 Repurpose outdated drawers or buckets as nesting containers by cleansing them completely and securing them in your coop.
These containers create cozy and personal spots for hens to put their eggs.
This ensures the eggs keep clear and making it simpler so that you can gather them.
In case your chickens should not laying many eggs, make certain to feed them this plant. This may assist improve their egg manufacturing to nearly double.
Supplies Wanted:
- Previous drawers or buckets
- Screws or nails
- A noticed (if vital)
- Cleansing provides (e.g., cleaning soap, water, and a scrub brush)
- A screwdriver or hammer
Meeting Directions:
- Begin by accumulating outdated drawers or buckets. These may be obtained from yard gross sales, thrift shops, or discarded objects you’ll have readily available.
- If you happen to’re utilizing outdated drawers, verify that they’re clear and freed from any contaminants. Scrub them completely with cleaning soap, water, and a scrub brush. For buckets, guarantee they’re additionally clear and dry.
- Decide the variety of nesting containers you need in your coop primarily based on the dimensions of your flock. Every nesting field must be about 12x12x12 inches to accommodate a hen comfortably.
- Safe the drawers or buckets in your coop by attaching them to the coop’s construction. If utilizing drawers, guarantee they’re degree and spaced aside to supply sufficient room for every nesting field.
- Connect the drawers or buckets securely to the coop utilizing screws or nails. Please guarantee they’re steady and gained’t transfer or fall throughout use.
- Place some clear bedding materials (reminiscent of straw or hay) inside every nesting field to make it comfy on your hens to put their eggs.
- Your chickens will naturally use these cozy and personal nesting containers to put their eggs, guaranteeing they keep clear and simply accessible so that you can gather.
Associated: Greatest DIY Meals Tasks For When SHTF
Grazing Field
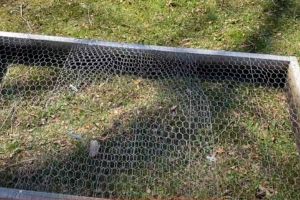 To make a grazing field, construct a picket body with hen wire on the edges and prime. Fill it with grass and herbs on your chickens to nibble on.
Chickens will love accessing recent greens, which might enhance their weight-reduction plan and general well being whereas additionally offering pure pest management.
Supplies Wanted:
- Picket boards (2×2 or 2×4 lumber works properly)
- Rooster wire or {hardware} material
- Screws or nails
- Noticed (if vital)
- Grass and herb crops or seeds
Meeting Directions:
- Start by gathering your supplies. You’ll want picket boards for the body, hen wire or {hardware} material for the edges and prime, screws or nails to safe the body, and grass and herb crops or seeds to plant contained in the field.
- Measure and reduce the picket boards to the specified dimension for the body. A sq. or rectangular form is typical; the scale will rely on the accessible house and the variety of chickens you’ve got. A field round 2×2 or 4×4 toes works properly for a small flock.
- Assemble the picket body by connecting the boards on the corners utilizing screws or nails. Make sure the construction is sturdy and degree, as it can assist the burden of the hen wire and the crops.
- Cowl the edges and prime of the body with hen wire or {hardware} material. This materials will shield the crops whereas permitting your chickens to peck by way of it.
- Place the grazing field in your coop or run, guaranteeing it’s safe and steady.
- Fill the grazing field with soil and plant grass and herb seeds or starter crops. Select crops which are protected for chickens, reminiscent of clover, chickweed, or basil. These crops will present recent greens on your chickens to nibble on.
- Because the crops develop, your chickens will get pleasure from accessing recent greens, which might enhance their weight-reduction plan and general well being. Moreover, the crops can act as pure pest management, attracting bugs on your chickens to forage on. It’s a easy, cost-effective means to supply your flock with pure meals sources and enrichment.
Rooster Tunnel
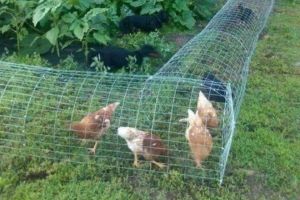 Assemble a hen tunnel utilizing sections of wire or hen wire panels. Create a coated walkway that enables your chickens to securely transfer from one space to a different.
This tunnel offers them more room to discover, protects them from predators, and prevents them from damaging your backyard or yard.
Supplies Wanted:
- Rooster wire or {hardware} material
- Picket or metallic stakes
- Cable ties or wire
- Wire cutters
- Hammer or mallet
Meeting Directions:
- Collect the mandatory supplies, which embody hen wire or {hardware} material, picket or metallic stakes, cable ties or wire, wire cutters, and a hammer or mallet.
- Decide the route and placement of your hen tunnel. Establish the beginning and ending factors, guaranteeing that the tunnel gives entry to areas you need your chickens to discover whereas protecting them protected from predators.
- Start by securing one finish of the hen wire or {hardware} material to a sturdy construction or submit. This may function the place to begin on your tunnel.
- Unroll or lengthen the hen wire or {hardware} material alongside your deliberate path. To create a curved tunnel, you should utilize picket or metallic stakes to bend and form the wire accordingly.
- Connect the wire to the bottom at intervals utilizing stakes. Hammer the stakes into the bottom, and use cable ties or wire to securely fasten the wire to the stakes.
- Proceed unrolling or extending the wire till you attain the specified endpoint, guaranteeing it’s taut and safe.
- Cowl the highest of the tunnel with further sections of hen wire or {hardware} material. Connect them to the edges of the tunnel to create a coated walkway.
- Safe the ends of the wire on the endpoint utilizing stakes, cable ties, or wire to create a protected exit from the tunnel.
- Make sure that the tunnel is predator-proof by inspecting for gaps or free sections. Make any vital changes or reinforcements.
Egg Carton Feeder
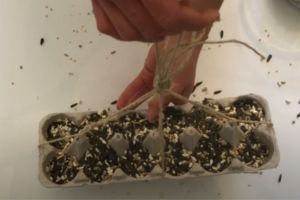 Repurposing empty egg cartons is easy. Simply fill the cups with hen feed or treats, and place the carton in your coop or run.
Your chickens can peck on the feed, protecting them engaged and decreasing meals waste. It’s a low-cost means to supply leisure and sustenance.
Supplies Wanted:
- Empty cardboard egg carton
- Rooster feed or treats
Meeting Directions:
- Accumulate empty cardboard egg cartons, ideally these with a dozen or extra cups. These may be saved out of your egg consumption or gathered from family and friends.
- Totally clear the egg carton to take away any residual eggshell or particles. Make sure that it’s dry earlier than use.
- Fill every cup of the egg carton with hen feed or treats. You should use their common meal or a particular deal with combination. This gives your chickens with leisure and sustenance.
- Place the crammed egg carton in your coop or run, positioning it securely and degree. You may relaxation it on the bottom, a picket block, or an elevated floor.
- Your chickens will get pleasure from pecking and foraging for meals within the egg carton cups. It engages their pure foraging instincts and gives psychological stimulation.
Home made Grit Dispenser
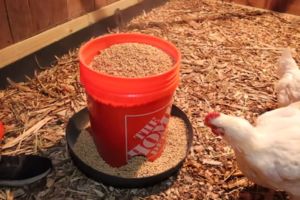 Make a grit dispenser by poking small holes in a plastic container with a lid.
Fill it with poultry grit and place it in your coop.
Chickens can entry grit to help their digestion, guaranteeing they course of meals successfully and stay wholesome.
Associated: 7 Rooster Errors You Ought to By no means Make
Supplies Wanted:
- Plastic container with a lid (a clear, empty, and dry container works properly)
- A small drill or a heated nail for making holes
- Poultry grit
Meeting Directions:
- Start by choosing an appropriate plastic container with a lid. This is usually a recycled container, reminiscent of a plastic espresso can, yogurt container, or related merchandise. Guarantee it’s clear, empty, and dry.
- Create small holes within the lid with a small drill or a heated nail. The holes must be giant sufficient for the poultry grit to stream by way of however not too giant that it pours out too shortly. Sometimes, 1/8 to 1/4-inch holes work properly.
- Fill the container with poultry grit, a sort of crushed rock or small stones that helps chickens grind down their meals of their gizzards for extra environment friendly digestion.
- Safe the lid on the container, guaranteeing it’s tightly closed.
- Place the home made grit dispenser in your hen coop, ideally in a sheltered space, to maintain the grit dry and clear.
- Your chickens can entry the grit by way of the small holes within the lid as wanted.
As you embark on these artistic tasks for the one that you love chickens, could your DIY endeavors be full of enjoyable and satisfaction.
The enjoyment of watching your chickens get pleasure from these easy but revolutionary additions to their surroundings is a reward in itself. Whether or not it’s the hanging treats, the hen swing, the grazing field, or every other undertaking you select, you’re contributing to the happiness and well-being of your flock.
So, right here’s to many extra clucks of contentment and a pleasant time spent tending to your feathered buddies. Completely satisfied crafting and chicken-keeping!
You may additionally like:
 Greatest States For Self-Protection. Do You Reside In One Of Them?
Why You Ought to Bury a Trash Can in Your Yard (Video)
25 Survival Objects You Ought to Get From The Greenback Retailer
The Forager’s Information To Wild Meals: Ebook Evaluation
Dying Of The Greenback


